|
|
Post by sky454 on Aug 28, 2012 11:08:01 GMT -6
Having fixed my starter electrical issue i've managed to get the engine turning over ;D but it's not catching  so next step seems to be a carb cleaning (drained the bows and the fluid looked okay but smelled varnishy). Probably some ethanol deposits in there. Prior to that i'm going to do the "daunting" valve adjustment. Following the steps to drain the coolant, i have removed the water pump drain plug (very small plug with the hole in it) but nothing comes out  There is a little "sludge" but nothing flows out. have tried to poke a qtip in there to stir it up but no luck. There is fluid in the reserve container and the radiator is full. Any suggestions before i open it up? Would rather not end up with a floor full of coolant. |
|
|
|
Post by eaglerider on Aug 28, 2012 11:30:11 GMT -6
Not "catching" term is sorta confusing...do u mean its not fireing? Check to see if you have spark at the plugs.....if the carbs are crudded up, you possibly are not getting fuel to the cylinders. Gas smelling "varnishy" leads me to figure the carbs need a thorough cleaning...possibly/probably some clogged orfices/passages in them. Yes, I would start with the valve adjustment.
Remove the" radiator" (tho not on the radiator) cap, that might relieve the system enought to let it drain... if not, there is likely crud/sludge preventing it to drain. Get a pan that will hold enough fluid, and remove the bottom radiator hose. Onece yo have the engine running, u can flush the system with some good radiator-cooling system flush. after a good flushing, re-fill with 50/50 antifreez & water.
|
|
|
|
Post by sky454 on Aug 28, 2012 14:46:48 GMT -6
I guess "doesn't fire" is the proper description. Engine sputters but doesn't continue to run. Have checked the plugs and they are wet. There is also new fuel in the carb bowls. I drained the fuel tank, cleaned the petcock and filter and put new fuel in.
Quick aside...is it okay to use 90 octane (<10% ethanol) in these machines or do they need ethanol-free gas (like my CBX)?
I tested the plugs against the engine and both have good spark. So maybe the timing is off but not hearing any pre-ignition or detonation. Either way valve adjustment couldn't hurt. Then a carb cleaning.
When i took the radiator cap off, the liquid is right there. it didn't help to start it flowing out the drain plug unfortunately.
Will try a little suction pump on the drain plug and maybe a wetvac. if no luck i'll remove the bottom radiator hose as you suggest.
|
|
|
|
Post by Jet⚡Black on Aug 28, 2012 15:48:45 GMT -6
I think it would be a good idea to just remove the whole radiator, so sludge from it won't drain through the engine. Then you can flush both thoroughly, and then re-install. Be careful to label the wires to where the go and mind the temperature switch at the bottom of the radiator, so the metal tab doesn't snap off.
If the carburetors were clean I think you'd be able to keep it running, the little jet holder holes are probably clogged all up. 90 octane is good to run when first trying to get a bike going, it's twice as stable and ignites easier.
|
|
|
|
Post by eaglerider on Aug 28, 2012 16:13:31 GMT -6
Just do not use the "Flex-Fuel (E-85)....this engine is not designed for it, and u will burn the engine up. I agree 100% with jetblack on removal and flushing of the radiator, and engine. U will likely get rid of a lot of gunk, by "back flushing with a garden hose in bothe the radiator and engine.....might should remove the thermostat before flushing the engine.
|
|
|
|
Post by wanchesenative on Aug 28, 2012 18:51:41 GMT -6
Ditto on removing the whole radiator. It is easier to get to the valve cover anyway. It's not necessary I don't think, but I was sure glad I took EVERYTHING off before trying the adjustment.
|
|
|
|
Post by eaglerider on Aug 28, 2012 20:14:56 GMT -6
 If u read the "disassembly" instructions, to make things easier, the radiador is to be un-bolted at the top, and leaned outward to increase clearance to remove the valve cover. Also the coils need to be unbolted to be able to raise them up for clearance.....things are a real tight fit, and ya still gotta "hold your mouth right" to get the cover off.  ;D
|
|
|
|
Post by Jet⚡Black on Aug 28, 2012 20:21:17 GMT -6
Lol, Eagle it's only Tuesday and you've made my week. "ya still gotta "hold your mouth right"" I forgot that taking the valve cover off is similar to backing a vehicle up or taking a photo; those things only work with your mouth open.
|
|
|
|
Post by sky454 on Aug 28, 2012 21:24:26 GMT -6
You guys are crazy ;D You're so right about the mouth open just right. Took me a while to get the rad off until i figured out i had to kinda stick my tongue out the side and give a very slight twist from the top. Heeded your advice and made sure to disconnect all the electricals and stow them away before tugging. So far so good. Minimal spillage and nothing snapped. So i can flush the rad with plain water from a hose? Or should i use distilled? Likewise for the water pump area. Just run some low pressure water through? In examining the drain plug i'm wondering if a piece hasn't broken off inside. I haven't been able to find an OEM picture on the web but my piece looks very short (no comments ). Will post a pic in the am. Thx for the help. |
|
|
|
Post by sky454 on Aug 29, 2012 13:15:40 GMT -6
Here's the drain plug i was talking about. Any idea if it's the right size?  Another troublesome thing i noticed was on the spark plug holes. They are not completely cylindrical. Both have a small arc "cut" out on the level just above the threads. Kinda hard to see in the pics but please tell me this is normal and not a PO damaging them by deciding to pry out a stuck sparkplug. 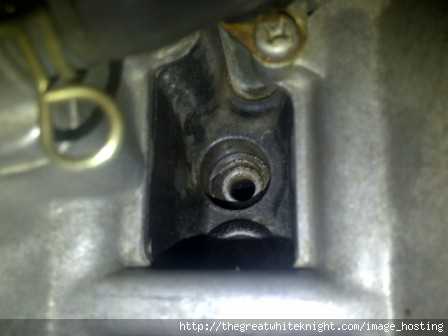 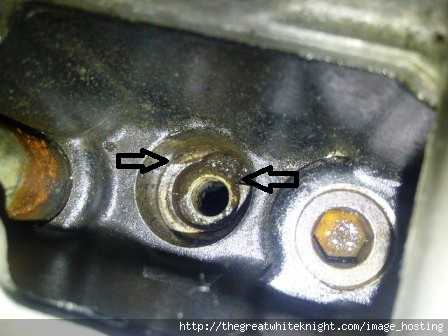 |
|
|
|
Post by Jet⚡Black on Aug 29, 2012 16:41:02 GMT -6
Nice pictures  The drain plug looks broken off; if you haven't look up inside to make sure it's not snapped off in the case. The spark plug area is ok, that is part of the weep/drain hole for it. Since it is so deep water could sit on the spark plugs so, kawasaki made a drain hole... if you look out side the case you'll see a little round hole on the head opposite of it. Edit: forgot to mention about radiator. I'd flush with a hose first then mix up some hot water and CLR in a jug. Fill the radiator half way and give it a really good shake and repeat til it runs clear. Then fill it all the way up with full strength CLR and let it sit for an hour or so. And flush the motor in the mean time. Then drain some then give it a really good shake. Then flush with a hose again. Remount then use Water Wetter as a mix, but if you do use water on the final fill distilled. |
|
|
|
Post by sky454 on Sept 9, 2012 19:53:21 GMT -6
Yep. The drain plug is broken off in there . Hence the lack of fluid coming out there. Suppose i should get it out at some point but going to leave it for now while i do the valve adjustment. Am going through the checklist and am at the dreaded water pipe screws. Not budging and getting close to stripping them. Any advice? |
|
|
|
Post by Blaine on Sept 9, 2012 21:07:09 GMT -6
Am going through the checklist and am at the dreaded water pipe screws. Not budging and getting close to stripping them. Any advice? Give them a tap on the side with a sharp chisel & they will loosen.Than take one to the hardware store & get a couple of bolts so you don't need to worry about them again.Don't forget a couple of new o-rings for the coolant pipes while your at it.  |
|
|
|
Post by Jet⚡Black on Sept 9, 2012 22:00:20 GMT -6
Spray them with something like PB or Kroil and soak them find a screw driver that fits the screws perfectly that has some grooves in the end to help bite, any slack in mating surfaces makes room for stripped screws pretty fast.
You can also tap it as Blaine suggests, careful to not snap the tab mounting off, you can also tap the back of the screw driver to help seat the bit, while turning counter clockwise; you might get lucky and it pop free. More leverage can be gained by locking vice grips near the end of the driver, using weight to press from the top and the grips to do the turning. To produce more torque low where it needs to be.
Ferrous metals like steel and iron actually fuse to aluminum like a weld over time, so heating with a torch helps really stubborn ones.
On the bright side the broken off drain bolt is hollow so an easy out should back that sucker right on out.
|
|
jp
Junior Member

Posts: 188
|
Post by jp on Sept 10, 2012 5:02:54 GMT -6
I used small hand impact, 5 bucks at harbor freight
|
|
|
|
Post by sky454 on Sept 11, 2012 9:11:32 GMT -6
Soaked in PB. Tapped with chisel. No joy. One stripped.  Will have to get inventive now. The screw heads are incredibly soft. Sigh. I guess on the bright side it indicates the PO never did a valve adjustment. |
|
|
|
Post by Jet⚡Black on Sept 11, 2012 9:49:16 GMT -6
If you have a dremel you can use a metal cutting wheel and turn the screw into a flat head. I've had to do it a couple of times in a pinch and it's worked out fine.
|
|
|
|
Post by sky454 on Sept 11, 2012 15:26:04 GMT -6
Will give it a try. There are various other tricks also. Hardest part is getting the proper vertical leverage with the frame center and tubes in the way. Patience. |
|
|
|
Post by Jet⚡Black on Sept 11, 2012 15:47:07 GMT -6
Replacing such things with a hex head is always a good idea too, once they are out. Screws in tight places and soft metal are irritating, to say the least.
|
|
|
|
Post by sky454 on Sept 11, 2012 16:07:34 GMT -6
oh ya. Saw the thread with the replacement hex head specs. If i ever get these off will definitely be replaced with well oiled hex bolt and maybe a washer.
|
|
|
|
Post by sky454 on Sept 19, 2012 14:58:08 GMT -6
at my wits end on these screws. Really losing enthusiasm. Have tried soaking with PB, tapping with chisel, dremelling to a flat head and they won't budge. Scraped knuckles, metal shavings, broken bits...i'm ready to chuck it in and turn it into a parts bike.
|
|
|
|
Post by eaglerider on Sept 19, 2012 15:54:23 GMT -6
Patience, perservere...u can always carefully drill them out and re-tap, if push comes to shove. Don't give up & don't quit.
|
|
|
|
Post by Jet⚡Black on Sept 19, 2012 16:48:49 GMT -6
Have you tried heat? Take a torch to that sucker.
|
|
|
|
Post by eaglerider on Sept 19, 2012 17:09:46 GMT -6
But be very careful....that head and valve cover is aluminum.....
|
|

 so next step seems to be a carb cleaning (drained the bows and the fluid looked okay but smelled varnishy). Probably some ethanol deposits in there.


 If u read the "disassembly" instructions, to make things easier, the radiador is to be un-bolted at the top, and leaned outward to increase clearance to remove the valve cover. Also the coils need to be unbolted to be able to raise them up for clearance.....things are a real tight fit, and ya still gotta "hold your mouth right" to get the cover off.
  ;D
;D


 Will have to get inventive now.